Yep, first DIY post is an industrial one.
Creating an industrial TV stand, that fits nicely in a loft, in Do-It-Yourself ( DIY ) style. Vintage look, with a lot of real rust!
Creating an industrial TV stand, that fits nicely in a loft, in Do-It-Yourself ( DIY ) style. Vintage look, with a lot of real rust!
 |
| Starting points |
I got these trolleys from a closed-down sewing workshop. They were in the warehouse of the factory, for pushing around the production stuff. Can it get more industrial than this?
Nevertheless, they rather look like they were found in a hospital. I was looking for blood stains, have not found any, fortunately.
Just like the table set on my terrace - another DIY article coming up later - these trolleys do not look the part while painted in white:
 |
| "Don't take it!! Lab. Thanks!" - some internal communication from the past :) |
So first things first: get rid of those ugly-ass chipboard shelves. They were fixed with pop rivets to the frame, so I went redneck: kicked them out of the frame. A little demolishing ain't hurt nobody, feels good though ;)
So, with that intelligent move done, I went after the rivets. They are one-way, so needed to saw them off.
 |
| Pop rivet, at its worst |
So I just grabbed my saw, and got rid of them rivets.
 |
| I saw it, so I saw it |
 |
| Pinchers do the job |
 |
| Rivet is finished |
I removed the wheels too, just to dismount them and get the tons of fabric out of the axles.
 |
| All of a sudden, it did a wheelie |
 |
| Wheeler dealer |
Needed to sand them too, seems like last time the frame was painted, the wheels got their fair share of color. It is great what such minimal amount of care can do!
 |
| Before - after |
With that done, I continued with the transformation from the hospitalish white look towards the industrial appearance: sanding the ugly-ass white paint. By hand. Have done it so many times, got no machine for that, I go the oldschool way.
 |
| Wind was blowing hard, I was sanding - Sandy Hurricane? |
This part is not that amusing. I used grit size 60 sandpaper as it was the roughest one I could find at home. Had to change them frequently as they get worn-out pretty quickly. Worth to do if you don't wanna spend your whole day sanding. Well, I actually did and got reeeealy bored. Anyways, it is done!
 |
| Bare metal |
Why sand it to the metal? As you may know, for a repaint it is sufficient to get a smooth surface, a little bit of old paint does not matter. Just spray / paint over, and it is fine.
Well, I have other plans! I am gonna go for the rusty look this time. As it will be in the flat, no need to to have a coat of varnish either, I just leave it plain rusty.
So next question: how to achieve that? Leaving it outside would certainly do the trick, takes too long though.
There are 2 ways I know about, may be more for sure:
1. Use hydrochloric acid to remove the grease, and then apply hydrogen peroxide to get your rust in no time. This is the fastest way, it's just that I am not a big fan of using chemicals.
2. Surprising as it may appear: BEER and SALT. Yes! :)
Okay, for you beer fans out there: I use really shitty beer for this, the type you would not care drinking. And yes, it is that simple:
- degrease the metal, with e.g. plain soap
- apply the beer: this time, I soaked a rag into the beer and wiped the metal frame with it. It allows to have an even spread and prevents you from wasting the beer
- grab your salt shaker, and pour salt all over it, before the beer dries, so that it sticks to the beer
That's it, your metal stuff is on its way to get that rough, rusty, industrial look. Last time I did this, it took the rust about 2-3 weeks to build up, it is fun to look at it too ;)
Only remaining question is: what to do with the shelves? My first thought was to make cut some glass. Thing is though that I am kinda bored of glass, have used all over lately as you will see in my upcoming posts.
Put some wooden shelves? Too ordinary.
And then it hit me! I am gonna attach thin laths to it, for that classy, elegant look. Close, but not quite, something's still missing.
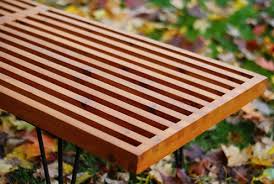 |
| Laths will serve as shelves |
FINALLY! I am gonna burn them too, for that aged look.
 |
| The Burn Identity |
With that settled, this sucker is on its way to that fly, classy, rusty industrial son of a bitch it is supposed to be.
Check back in a couple days to see the advance in the rusting process, and take a look at the laths I am gonna prepare too.
And share this article if you liked it! Cheers, see you soon!
Interesting stuff man! Thanks for sharing
ReplyDeleteThanks man :) Much more coming up
Delete